The following was published in CCJ's Air Brake Book, 11th edition, sponsored by SilverbackHD. CCJ's Air Brake Book is a complementary industry resource, courtesy of our partnership with SilverbackHD, the Technology and Maintenance Council and Commercial Vehicle Safety Alliance. You can download the entire Air Brake Book here.
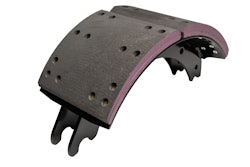
Brake linings should be replaced before they completely wear away – resulting in metal-on-metal contact between the brake shoe and the brake drum, which causes potentially catastrophic component failures and expensive replacement costs.
Replacing linings in a timely fashion also will prevent the possibility of S-cam turnover.
It is widely accepted that brake linings worn down to a quarter-inch thickness are in need of replacement. Carefully measuring lining thickness is recommended, but if you are performing a visual inspection, look for lining thickness that is slightly higher than the rivet heads that secure it to the brake shoe.
But don’t simply slap new shoes on and put the vehicle back in service. Relining time is an excellent opportunity to tune up the entire brake system and ensure safe, efficient stopping power for many miles to come.
Inspecting foundation brakes
It’s easy to check over the foundation brakes when the wheel is off an axle. Keep an eye out for excessive deflection or loose and broken parts. You also want to look for excessive component wear – most notably on the cam splines, which can allow lost motion between the automatic brake adjuster and S-cam.
Replace the camshaft and the slack adjuster if there is more than .020 inch of free movement between the adjustor and the S-cam. This is also a good time to check the clearance between the slack clevis pin and its bushing.
Once again, clearance between the two components should not exceed .020 inch. If the slack adjuster has to be removed, use an anti-seize compound on the camshaft splines to make it easier to remove next time service work is performed.
Once removed, closely examine the old brake shoes before you toss them in the core bin. They can tell you a lot about what’s going on with the foundation brakes out on the highway. Are any linings cracked? That’s a sure sign of additional problems, most likely a shoe that’s out of arc, rust buildup on the shoe surface, improper riveting or duty cycle.
Lining wear should be even around the circumference of both brake shoes, from inboard to outboard. Tapered wear patterns – where both shoes show accelerated wear at the top or bottom – or inboard or outboard side – is an indication that peripheral brake hardware is worn. As a result, the brake cannot be adjusted properly. Ideally, you should see uniform wear patterns all the way around the brake linings.
Worn anchor pins, holes and bushings or outer S-cam bushings can allow applied force to push the brake shoes to one side. This not only results in tapered lining wear, but also can cause outer edge abrasion on the brake shoes. This condition also can be caused by drum deflection at the open side.
For those reasons, reusing shoe rollers and anchor pins is not recommended.
Don’t confuse a designed-in taper with one caused by unbalanced brake wear. Many brake shoes feature a cam end that is thicker than the anchor end to allow geometry optimization in an effort to gain full contact to the drum.
Also don’t confuse tapered lining wear with a high ridge on the inside edge of the linings. This actually is beneficial, as it prevents a lip from being etched into the drum and makes drum removal easier while keeping water and contaminants out of the brake assembly.
If you do find uneven lining wear between the leading and trailing ends of a shoe, you’ll need to check several components to pinpoint the cause.
Such wear may be the result of a weak return spring, a worn outer S-cam bushing, an out-of-arc shoe or a high-energy duty cycle. Attempting to adjust a brake with any of these conditions will result in dragging and high contact pressure at one spot of the lining, leading to rapid lining wear and heat damage to the drum.
Brake disassembly and repair
If lining wear is unacceptable, it’s time to remove the worn brake shoes and replace them. It’s also a good time to replace any associated components and check for leaks to ensure safe and reliable braking characteristics.
When removing anchor pins, don’t heat the spider and try to hammer them out. Heating removes the metal’s temper, and hammering a hot spider will cause permanent distortion, reduced brake performance and abnormal wear. If the anchor pins don’t come out easily, douse them with a light penetrating oil and give it time to work in before tapping them out as gently as possible. You also can use a specifically designed puller.
Once you’ve got it out, clean the spider with a solvent and wire brush, and inspect it for broken welds or cracks in the camshaft and anchor pin areas. Check tightness of the spider-securing bolts, and be sure the spider is not bent.
The anchor pin holes must be parallel to the centerline of the axle. Otherwise, the shoes won’t track in the drum properly, which will cause tapered wear.
If the old liners are covered with oil or grease, you need to identify and correct the cause before putting new shoes on. The problem is almost always a leaking oil seal, too much grease on a grease-type wheel bearing or camshaft bushing or from careless handling. If there is some grease or oil on the old lining — an area no larger than 10 percent of the total lining area – then the spot can be cleaned with brake cleaning solvent (not gasoline or other substitute). However, this isn’t the safest option as it could lead to a brake imbalance condition if done improperly.
Check the cam bearing surfaces for wear before installing the new brake shoes. Replace any cam if wear exceeds .010 inch. You can reuse a cam that’s within tolerance but has deep grooves caused by the seals, however it’s generally recommended that no more than 0.030 inch of total radial play since at that point the seal lip may no longer be effective at keeping contaminants out and will cause accelerated bearing and cam wear. The cam bearing itself should be replaced each time the brakes are relined.
Carefully examine the S-cam and rollers for flat spots and irregularities. An irregular surface on these parts will cause brake noise and cause brake “grab” and slower release times. It is best to replace the S-cam if you have any doubts about its condition. Return springs are inexpensive, and there’s almost no excuse for reusing them. If you must, be sure they’re not stretched, broken or corroded. Be sure to lube the cam bearing and seals, and anchor pin bores and bushings when reassembling.
Now you’re ready to install new brake shoes.
First, make sure the lining is tight and follows the contour of the new shoe. Always check a replacement shoe’s dimensions – don’t assume it’s okay just because it has new lining.
Most experts stress the importance of using known name-brand replacement linings and brake components. A rash of counterfeit and “look-alike” will-fit parts from overseas are readily available today, often at discount prices. But they rarely perform up to the standards of the original parts and may be unsafe to install and use. Worse, they can be a tremendous liability for your fleet if a jury finds you or your technicians knowingly installed counterfeit or substandard parts on a commercial vehicle involved in an accident.
Inspect the brake drum before you put it back on over the foundation brakes. No matter how good a reline job you’ve done, the linings must have a smooth, round drum to rub against, or the brakes aren’t going to perform properly. Some light scoring and abrasions are fine as long as they haven’t cut any deeper than .010 inch into the drum.
A drum with surface heat checks should be inspected periodically, as the checks may wear away over time. If it’s obvious that they are getting worse, discard the drum. Needless to say, any crack through the drum’s thickness means the drum should be scrapped.
Heat generated in intense (downgrade) braking situations can distort drums quickly, so it’s important to check and make sure the drum’s circumference is within tolerance.
Use a dial indicator to measure a mounted drum’s diameter in the center of the rubbing path. Take another measurement 90 degrees from the first one, again in the center of the rubbing path. If the two measurements are not within .010 inch of each other, the drum can be cut or rotated one bolt hole and rechecked. If severely out of round, the drum should be discarded. Whether a drum should be cut (turned) is a matter of debate. Turning a drum removes valuable metal and reduces the drum’s effectiveness. If you want top performance, replace drums as wear approaches .080 inch.
The key to a good reline is to remember that brakes are a system of components working together to get the job done. For that reason, it is vitally important to replace linings by axle sets rather than individual wheel ends to avoid performance differences. If any part of the system isn’t right, the brakes are not right and the vehicle is unsafe. Wheel seals, bearings, axles or anything else you touch during a brake job should be treated with the same respect given the brake components. Bring everything as close as possible to original condition, and you won’t be sorry. It costs more upfront, but a thorough job will pay for itself in longer life and trouble-free operation.