The following was published in CCJ's Air Brake Book, 11th edition, sponsored by SilverbackHD. CCJ's Air Brake Book is a complementary industry resource, courtesy of our partnership with SilverbackHD, the Technology and Maintenance Council and Commercial Vehicle Safety Alliance. You can download the entire Air Brake Book here.
Inspecting air brakes should be done any time a truck or tractor is in the shop as an integral part of a preventive maintenance schedule to ensure safe operation on the road.
If you are inspecting brakes, you should become familiar with federal and state periodic inspection requirements. Anyone performing required periodic inspections must meet specific criteria in terms of experience and training.
If your vehicle cannot meet these criteria at a roadside inspection, it will be placed out of service.
Generally speaking, a commercial vehicle air brake system should be visually inspected at least every three months, with more thorough inspections carried out according to application and manufacturer recommendations.
This often includes an in-depth inspection for linehaul tractors every six months or 100,000 miles – whichever comes first – and every four months in on-highway linehaul applications when seals are replaced and brakes relined.
Bear in mind that application plays a major role in air brake inspection intervals. Trucks and tractors working in harsh vocational and off-highway environments require more frequent inspections since abrasive materials found on jobsites will accelerate lining wear and aggressively corrode other brake system components.
Visual inspection should focus on obvious signs of worn or damaged parts, but you should also be alert for more subtle signs of problems: chafed parts, poorly routed air lines or any indication that a component in which failure could be eminent.
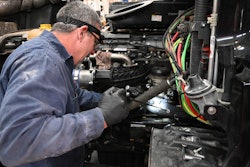
Experts recommend you inspect the air brake system as an entire entity at one time, starting at the front and systematically working your way to the back of the vehicle. Since clean air – and a large supply of it – is the lifeblood of any air brake system, start your inspection with the compressor under the hood.
Compressor check
If you’re working on an older model truck or tractor, start by inspecting its air compressor drive belt for proper tension, cracking and general wear and tear before you do anything else to the belt.
Next, start the engine.
According to Bendix, after it is warmed up, run the engine at full-governed rpm. The air compressor should build pressure in the system from 85 to 100 psi in 40 seconds or less on vehicles with normally sized air reservoirs. If it takes longer than 40 seconds to reach specified pressure levels, you’re going to have to check the system for leaks or problems with the air compressor.
During your PM inspection, disconnect the discharge line from the compressor to see if it’s clotted to the point where its inner diameter is noticeably reduced. That’s a sure sign the compressor is passing excess oil and needs service.
An air compressor with worn rings can introduce oil into the brake system and the oil can gum up components and damage brake valves. Following a PM schedule for changing air compressor oil (or engine oil if the compressor uses or shares it for lubrication) is the easiest way of preventing premature ring damage.
Leaks and adjustment
Once the compressor has been checked, it’s time to make sure there are no leaks in the air system. Start the engine and run it until the air brake system is fully pressurized. With the air brakes released, shut off the engine, release the service brakes and time the resulting air pressure loss. The loss rate should be less than 2 psi per minute for straight trucks and less than 3 psi per minute for combination vehicles.
Next, apply the service brakes to at least 90 psi and time the pressure drop while holding steady pressure on the pedal. (Don’t count the initial air pressure drop that will occur when you apply the brakes.)
Here, the air pressure loss rate should be less than 3 psi per minute for straight trucks and less than 4 psi per minute for combination vehicles.
If the pressure on the gauge drops more than that, you’ve got an air leak to track down. One tried-and-true method of locating air leaks is to paint the air lines and connections with soapy water and watch for bubbles. You also can use an ultrasonic leak detector. Refer to the CVSA guidelines for specific out-of-service criteria.
If the system is holding air, you can move on to wheel end and brake component checks. Begin by checking that both wheel ends of each axle have the same linings and drums. All four tandem-axle wheel ends also must have the same linings and drums. Remember that it is not necessary for the front axle brakes to be the same as the rear driving axle brakes.
 The proper power stroke is a function of the brake chamber type, and you must refer to a table in the manufacturer’s literature to obtain the maximum allowable value.
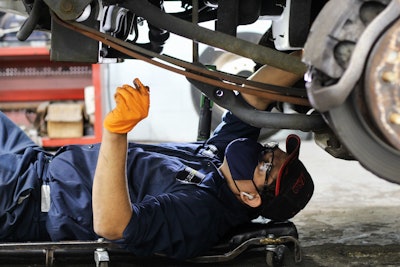
To start, the return springs must retract the shoes completely when the brakes are released. Likewise, the spring brakes must retract completely when they are released. Then measure brake chamber strokes. To do this, check both the free stroke and the power stroke at each wheel end. Free stroke indicates how far the pushrod moves before the lining contacts the drum. Power stroke indicates how far the pushrod moves when the brake chamber is pressurized to 80-90 psi. Before taking measurements, verify that the parking and service brakes are fully released.
Next, measure the distance from the center of the large clevis pin to the mounting surface of the air chamber while the service brake is released. This is your released – or reference – position. Use a pry bar to move the slack adjuster just enough to bring the linings in contact with the drum, and again measure the distance from the face of the chamber to the center of the large clevis pin. (If it is out of adjustment at 80 to 90 psi, you may be in violation of CVSA out-of-service criteria.) The difference between these two measurements is the free-stroke. Free-stroke should be 0.5-0.625 inch (12.7-15.9 mm) for drum brakes. If the measurement is too short, linings can drag and cause damage to components. To determine power stroke, start the engine, build reservoir pressure to between 90 and 100 psi and shut the engine off (if pressure is over 100 psi, pump the service brake to bring it back down into the 90 to 100 psi range). Fully apply the service brake (pedal to the metal), and once more take a measurement from the large clevis pin to the face of the chamber. This part will take two people, one to apply the pedal and one to take the measurement. The difference between this last measurement and the reference (or release) stroke measurement is your power stroke.
The proper power stroke is a function of the brake chamber type, and you must refer to a table in the manufacturer’s literature to obtain the maximum allowable value. If the power stroke is too long, braking power (and vehicle safety) will be reduced, and you can be put out of service at a roadside inspection.
While it is permissible to adjust manual slack adjusters to obtain the proper free and power strokes, adjusting automatic slack adjusters is not allowed. The adjusting nut on the automatic slack adjuster is just for setup during initial installation of the adjuster or during brake relines; never use it otherwise. If they are not maintaining proper stroke, something is either wrong with the adjuster, or there is a problem in the foundation brake, and further diagnosis is required.
Lubrication is a crucial aspect of proper brake system maintenance. If you’re lubing a truck chassis as part of a scheduled PM, it’s a good idea to make sure brake adjusters, air chamber brackets and anchor pins are lubricated properly as well. Doing so will ensure proper automatic adjuster function and that manual adjusters are easy to manipulate. It also allows camshafts to rotate freely and reduces wear and tear on components. Always follow manufacturer recommendations when lubricating brake components, and take special care to ensure no grease or oil gets on brake linings.
Relining and component inspection
Sooner or later it will be time to reline the brakes on your commercial vehicles, although a huge number of variables such as weather, operating environment, application and PM schedules make reliably predicting intervals impossible.
Careful tracking and experience will give you a general idea of when the vehicles in your fleet are due for brake relining, but remember that the same variables that make broad relining recommendations impossible can and will shorten or lengthen service intervals for individual trucks. This is why a good inspection policy is so important for good brake maintenance programs.
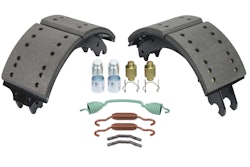
As noted, lining thickness should be measured whenever the vehicle is being serviced, or at least once every three months. If the thinnest part of the brake lining is down to about 1⁄4-inch thickness, it’s time to replace the linings. Most linings today have a wear indicator machined into the friction material. In many cases, it’s a divot or a line across the material to help you determine if replacement is required. While you’re examining lining material depth, it’s also a good idea to look for cracks along the edges of the shoe and cracks in the assembly where the rivets are found.
A cracked lining definitely will put that vehicle out of service, so if you find anything amiss, replace the shoes even if the lining material is not worn down to critical levels. You also should check the anchor pins for corrosion and wear, and replace them as needed. Check the brake shoes for rust, expanded rivet holes, broken welds and correct alignment. Replace a shoe with any of the above conditions.
Additionally, check the spider for expanded anchor pin holes and cracks. Replace any damaged spiders and anchor pin bushings. Inspect the camshaft bracket for broken welds or cracks, and verify correct alignment. Any damaged brackets must be replaced at this time.
Brake drums don’t wear as quickly as linings, of course, but now is a good time to inspect them and make sure they are in good operating order. You should never allow a vehicle to leave your shop with a brake drum worn or machined beyond the discard dimension indicated on the drum, as this fault may not allow the brake system to operate correctly and cause damage to other vehicle components and/or result in serious injury.
Also replace any brake drum if it is out-of-round. Do not turn or re-bore a brake drum, which decreases its strength and capacity. Check the brake drums for cracks, severe heat checking, heat spotting, scoring, pitting and distortion, and replace them as required.
When replacing brake shoes, you also should adhere to the manufacturer’s recommendations. Simply matching the friction letters in the edge code (last two letters in the edge code) does not ensure the part’s original friction and wear characteristics will be present in the new part. To get the same characteristics, you must match the entire edge code.
Once you’ve determined the correct brake shoes, make sure they correspond in size to the parts they’re replacing and that all rivets are tight, shoe-to-lining clearances are correct and all slots and holes are the proper shape and size.
Now is a good time to look carefully at cams and camshafts in the brake assemblies. The cam faces should be smooth and free of any pitting, scoring, ridges, cracks or flat spots. Camshaft journals should be smooth, and any cracked or deformed splines should be replaced. Move the S-cam up and down to check for any radial play. Some movement – only a few hundredths of an inch in either direction – is permitted, although excessive movement can cause uneven brake application and chatter. Use a dial indicator if you’re not sure.
Check the chamber brackets for cracks, bent areas, looseness or any worn or damaged bushings (or bearings, if so equipped) and seals. All brake chambers should be inspected, keeping an eye out for cracks, clogged vent holes, bent pushrods, loose mountings or air fittings and clamps. Look over the brake adjusters as well. Again, you’re looking for cracks, damaged splines, worn clevis pin bushings or sticking adjustment nuts.
Although some technicians opt to inspect return springs and keep them in service, most manufacturers recommend replacing return springs each time the brakes are relined. Return springs are highly stressed during normal driving conditions, and even if they are slightly corroded, there’s a good chance they could fail.
Before you service a spring chamber, follow the manufacturer’s instructions to compress and lock (cage) the power spring. Also verify that no air pressure remains in the service or spring chamber before you proceed, as the sudden release of compressed air can cause serious personal injury and component damage.
Don’t skip the hoses and tubing
Brake hoses and tubing are critically important to the performance of the entire braking system, so it’s important that these components be in good shape and free of kinks, said Brian Screeton, Bendix supervisor – technical service training.
“Visual inspections should also include regular checks of tubing and hose condition, positioning, and connections, both during pre-trip walkarounds and in the shop,” he said. “Additionally, we recommend that before drivers get on the road, they routinely perform 90- to 100-psi brake applications – with the wheels chocked and the parking brakes released – listening for leaks that might be attributed to hoses and/or tubing.”
Additional inspection recommendations
Brake system veterans offer the following well-accepted practices for inspecting air brakes:
• Occasionally squeeze rubber hoses to check for soft spots that indicate internal damage. Blisters inside hoses can restrict air flow and adversely affect system performance. Never pinch hoses with pliers or vise grips, as this will initiate such damage.
• Have drivers exercise care when making tractor-trailer air connections. The gladhands should be checked for debris and wiped down or tapped out if necessary. There’s no practical way to completely purge an air system, so a lot of what goes in stays in. Accumulated foreign matter eventually will interfere with proper system operation. Also, air lines should be suspended well above deck plates to prevent hose chafing.
• Wherever possible, specify that brakes be mounted so that, as they are applied, S-cams rotate in the same direction as the wheels they serve. When S-cams apply opposite the direction of wheel rotation, hardware and linings wear out more quickly and brakes are noisier.
• Don’t let the compressor unloader be the forgotten component. Once a year, remove and lubricate it, and replace all rubber parts.
• Don’t mix manual and automatic brake adjusters on a vehicle. That’s asking for an adjustment imbalance. If its unavoidable, never mix them on the same axle.
• Use only recommended air dryer or system anti-freeze chemicals. The wrong ones can attack rubber parts and cause system leakage.
• Maintaining brake systems before trouble occurs will prevent lots of problems and minimize ones that crop up. You always can take the “fix it when it breaks” approach, but in the long run, it’s going to cost you.