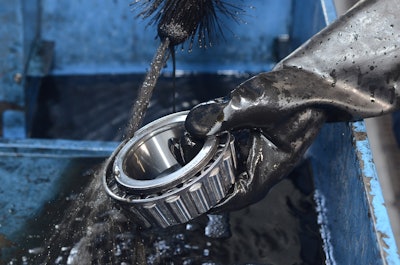
 SKF says to remove bearing cup if it or the bearing cone require replacement.
SKF has produced a detailed technical bulletin regarding service best practices for greased wheel ends.
The recommendations include guidance for manually adjusted, hard greased (NLGI 1, 2 and 3) and semi-fluid greased (NLGI 000 and 00) wheel ends. These recommendations also include information about symptoms of a failing wheel, wheel end inspection and service, and safe, high-quality workmanship, SKF says.
Safety First: When performing maintenance, SKF first states to never work under a vehicle that is supported with only a jack. Always support the vehicle with proper stands. Block the wheels and make sure the vehicle will not roll before releasing brakes. Always wear eye protection and all necessary protective apparel. Follow all safety policies and regulations. Never put anyone at risk of injury.
SKF says the following are symptoms that a wheel end likely needs service:
- Hot to the touch hubcap (Careful: hubcap could be extremely hot)
- Site glass (oil) on hubcap is discolored or burnt
- Low lubrication level
- Wetness around hubcap gasket area
- Vibration or wobble (Serious condition: service as soon as possible)
- Grinding noise
- Abnormal side pull when braking
- Burning smell
- Smoke after returning from the road
- Whenever a wheel end has been submerged in flooded waters (Wear safety equipment. The water could be toxic.)
- Putting vehicle back into service after long storage (seals may have taken set and/or become contaminated)
- Wetness around wheel seal
Inspections
SKF says a driver should usually perform a Level 1 pre-trip (in-service) inspection prior to every trip and whenever driver returns to vehicle while in service.
The company says inspection steps include: Inspect as soon as vehicle is stopped: Feel hubs/hubcap for excessive heat while taking care to avoid burns. Note variance in temperature between wheel ends. Inspect prior to going on the road: Visually inspect each wheel end for loose, damaged or missing fasteners. These conditions will shorten bearing life.
SKF warns missing nuts or lugs can cause wheel loss. Also, inspect each hubcap for missing or loose bolts and check for wetness at the hubcap.
Additionally, SKF states if no brake job has been done in seven years, perform a Level 2 detailed inspection. Otherwise, these procedures should be included in a proper brake job.
SKF says Level 2 inspection steps include:
- Conduct all of the inspection criteria listed under inspection Level 1
- Lift and support each axle. Rotate wheel, checking for vibration. If rotation is not smooth or a vibration is detected, carefully inspect bearings.
- Check bearing end play with a dial indicator. If end play is out of the TMC-recommended range (RP618) of 0.001-0.005 inch, inspect bearings for wear and damage.
- Pull outer bearing and inspect lubricant level. Both over- and under-fill conditions shorten wheel end life.
- Semi-fluid grease should be 3:00/9:00 fill level
- Hard grease should be present between all rollers and filled in the hub cavity to the bearing races.
- Inspect condition of grease
- If petroleum-based oil is milky white or foamy, it has been contaminated with moisture. Clean all lubricant out of hub, clean and inspect bearings for damage. In general, it is not recommended to use hubcaps with an oil level window and synthetic grease. Synthetic grease can normally appear cloudy and thick.
- If grit or hard particles are present, grease/oil has been contaminated with external dirt, rust, grit or metal debris from failed wheel end component (i.e., bearings). Use magnet to determine if metallic and if so, carefully inspect bearings and other internal metal components.
Removal and component inspection
In instances when component removal is necessary, SKF notes to first be careful to keep all components of each wheel assembly together and keep each wheel assembly’s components separate from those of other wheel assemblies.
SKF states Removal steps include:
- Remove lug nuts and bolts.
- Carefully inspect nuts and bolts. Replace any that are damaged or cracked, following proper protocol for wheel type.
- Using a wheel dolly, pull the wheel from axle.
- Clean the bearings in solvent, handling with extreme care.
- A dropped bearing should not be reused.
- Suspend or hold bearings while cleaning; do not lay them or allow them to rest in bottom of the container. Sediment will sink to bottom of container.
- Use an approved solvent.
- Dry bearings thoroughly. If compressed air is used, DO NOT allow bearings to spin and always wear safety glasses.
- Be sure to put bearing cone back into the same hub from which it was removed.
- Remove bearing cup if it or the bearing cone require replacement.
- Ferrous hubs: Use hydraulic press to remove cups.
- Aluminum hubs: DO NOT USE hydraulic press. Instead, weld bead around the face of the bearing cup. Allow to cool 15 minutes. Remove by hand.
- Inspect both inner and outer races and cones. Look for discoloration, wear, spalling, pitting, etching or rust. All of these conditions warrant bearing replacement. Replace both cone and race.
- Inspect spindle all around for flat spots, burrs, deep scratches, gouges and cracks. Be sure to inspect carefully under side of spindle.
- Fill grooves with a hardening gasket material. Smooth with emery cloth.
- Inspect spindle end threads.
- The threads on spindle and nut need to be intact without grooves or damage.
- Chase spindle axle threads to remove burrs or deformed materials. Replace if needed.
- A fine emery cloth may be used on the spindle surface as needed.
- Inspect spindle nut.
- Replace if threads are damaged, wear marks are present, or keyway, keeper ring or tab is damaged or missing.
- Inspect hubcap for evidence of leakage.
- Look for cracks in hubcap.
- Check to see if flange is flat. A bent flange may not provide a good seal.
- Check to see if vent is clear.
- Use new gasket whenever hubcap is removed or replaced.
- Remove seal with SKF SRT-1 or another tool designed not to damage hub or bearing. Inspect the seal. The SRT-1 uses leverage and avoids back strain.
- Always replace seal once wheel is pulled from vehicle. The seal can provide useful evidence for failure analysis. Wetness may not be present, but seal lip wear path can indicate the running condition.
- Wear protective gloves and thoroughly wipe out old grease from hub and inspect spoke wheel or hub for cracks, nicks or damage, including seal bore.
- Replace or repair as needed.
Installation and re-assembly
Before re-assembling a wheel end, SKF notes to first place a light coating of grease on all metal components for corrosion protection, using same grease as in hub. DO NOT mix lubricants, the company says.
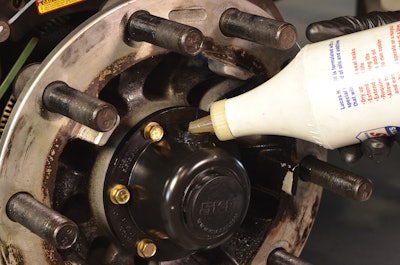 After mounting hub and hub cap is installed correctly, SKF says to fill hub cavity through side fill plug locked at or near the 12:00 position to indicted oil level line on hub cap window.
SKF says other steps are as follows:
- Pressure pack the clean, dry wheel bearings with hub grease, filling the space between roller and cage. Smear excess along outside of rollers.
- If new bearing cups are required, the installation procedure will vary, based on ferrous or aluminum hub material.
- Ferrous hubs: Use proper driver to install cup, being sure the hub is free of burrs, nicks or other damage.
- Aluminum hubs: Prior to pressing cup into hub, heat the inspected and damage-free hub in an oven to 250-300°F (using a temperature probe) and chill cups in freezer.
- Use a 0.002-in. feel gage to ensure cup is properly seated.
- Place hub assembly at 45 degrees to facilitate seal installation. Place clean, dried and grease-packed inner bearing cone into hub.
- Scotseal PlusXL does not require special tool.
- Be sure to lightly lube OD and ID with hub lubricant.
- Wait five minutes before mounting hub back onto vehicle.
- Scotseal Classic: Be sure to select the correct installation tool.
- Rotate seal in the bore to find best fit.
- Drive the seal until it bottoms out. Once tone changes, DO NOT STRIKE AGAIN.
- Whenever a seal is installed cocked, redo installation with a new seal while vehicle is still in shop. This will be far less expensive than experiencing an unplanned road service later.
- Scotseal PlusXL does not require special tool.
- Pack the hub cavity with grease:
- Hard grease – Before installing hub onto spindle, place grease into hub between the two bearing cups to the level of the cup’s smallest diameter. Fill the hub, except for the spindle hole diameter.
- Semi-fluid grease – After mounting hub and before outer bearing cone is installed, continue to support hub and fill the bottom of the hub cavity until it reaches 9:00/3:00 level.
- Oil – After mounting hub and hub cap is installed correctly, fill hub cavity through side fill plug locked at or near the 12:00 position to indicted oil level line on hub cap window. DO NOT overfill to avoid oil from weeping out of the center plug.
- Using wheel dolly, align the wheel assembly with the spindle and push into position with one fluid motion.
- Bumping the seal on the spindle will cock it and replacement is recommended.
- With the wheel dolly still supporting the tire and wheel, place clean and dried, grease-packed outer bearing cone into hub.
- Properly torque rim clamps before adjusting wheel bearings to ensure proper bearing adjustment.
- Hand tighten adjusting nut (do not use pneumatic tool) and then remove wheel dolly.
- Using a calibrated torque wrench, follow TMC RP618 for bearing adjustment.
- Use a dial indicator to measure endplay, which should be between 0.001 and 0.005 inch.
- Redo adjustment procedure until proper endplay is achieved.
- Install hubcap and gasket.
- Follow a star pattern and torque to the value specified for the hubcap type.
- TF Zytel Hubcap: 12-16 ft.-lbf. (use supplied assembled washer bolts)
- Steel hubcap: 10-14 ft.-lbf.
- Lexan spin-on: 60-70 ft.-lbf.
- Vented hubcaps are recommended to allow wheel end to release increased pressures, which can occur during normal operating conditions of the wheel end.
- Follow a star pattern and torque to the value specified for the hubcap type.
- Install the wheels and torque wheel bolt nuts in a star pattern to 200- 250 ft.-lbf. Be sure all nuts are equally tightened to prevent tire wobble.
Use of genuine products
Finally, SKF notes the importance of replacing genuine components at all times. Regarding its product lines, SKF says there have been imitators of SKF Scotseals over the years. SKF has tested these seals under the same conditions that genuine SKF seals go through in the qualification stage. None tested has even approached the life of genuine SKF.
The company says seals and bearings are safety-critical components and are relatively inexpensive in the overall operation of the vehicle. This is no place to cut corners. SKF says wheel separations have disastrous possibilities. Using inferior products when public safety and company liability is involved is extremely risky with little reward.
Besides the risk, cost of ownership is not reduced despite the lower acquisition cost. Shorter wheel end life puts the vehicle into service more often and actually costs more during the life of the vehicle, the company says.

