Stemco provides the following information on the proper way to install hubodometers and brackets:
* Add lubricant to the proper fill level.
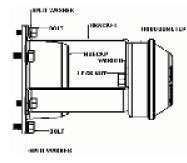
* Mount the hubodometer to the face of the bracket. Use a washer under the locknut (as shown in Figure 1).
* Use 15 ft.-lbs. of torque to tighten the locknut. Do not use an air impact wrench and do not exceed 15 ft.-lbs. of torque.
* If necessary, use a strap wrench to hold the hubodometer while tightening the locknut.
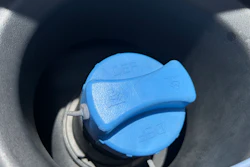
* Do not use paints, solvents or thinners on the hubodometer face, Grilamid hubcap or hubodometer hubcap
window.
*Remove necessary bolts for bracket installation. Note: some lubricant may drain out. Refill as needed.
* Mount the bracket and hubodometer assembly. Split washers are recommended to lock the bracket bolts in place.
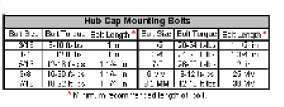
* Torque the bolts to the recommended hubcap specification. Refer to Figure 2 for Stemco’s hubcap bolt torque specifications.
The recommended torque for the 3⁄8-inch pipe plug for aluminum hubcaps is 9 ft.-lbs. A suitable sealant may be used on the pipe plug thread if desired. On Grilamid hubcaps with plastic fill plugs and O-rings, torque should not exceed 10 ft.-lbs.